Wednesday, March 3, 2010

RSVP

A credit card bill, a reminder from your dentist, some pizza coupons,...and what's this? A wedding invitation? You know that little spark of excitement - keep it in mind as you plan your wedding invitation. Give this precious piece of paper your all. Wedding invitations (besides providing the who, where and when) offer guests a sneek peek at what's to come. Make that vision something truly special to behold.

Order: Three to four months before the wedding date. The sooner you order, the more time you will have to proof them, address them and mail them out. Remember, its one invitation per household not per guest so if you have 150 guests, you will want to order somewhere in the number 0f 75-100 invites. Its always best to have a few extra as re-ordering a small amount can be very pricey!

Design: Since your invitation is the first look at your wedding, chosing a colour scheme or theme to co-ordinate with your wedding is ideal. Paper options, ink colours, and fold types can make a great impression. Many invitation books offer sample verses and proper etiquette rules for listing the hosting/sponsors of the wedding (ie: parents, bride and groom etc). Make sure you spell all addresses and dates in proper words (ie: 2010 would be two thousand and ten).

Send: Six weeks before the date is common; eight weeks is ideal (10 weeks if guests are coming from abroad).

Addresses: Spell out all words in an address on your envelopes. Rather than "St.," "P.O. Box" and "Apt." use "Street", "Post Office Box" and "Apartment". This applies to the city, province/state names as well.

Return Address: The preferred place for the return address is on the envelope's back flap. This ensures that undeliverable invitations will be returned to you should there be any problems with the mailing address or postage. You'll want the replies to be returned to whom ever will be keeping track of the guest list.

Outer and Inner Envelopes: Sending out an invitation in two envelopes ensures that your guest will receive a envelope, even if the outer one has been torn or soiled in the mail. Still, the two are not necessary; you may omit the inner envelope if you wish. The outer envelope includes all the information the postal service needs for delivery. The inner envelope should have the names of the invited guests in the household (including children, whose names do not appear on the outer envelope). It is etiquettely correct to send a separate invitation to children over 18 in the same household.

Remeber to add "guest" beside a single guest's name if you are allowing them to bring one to your wedding. If you know the name of the guest, it is more personal if you include their name on the inner envelope. If you do not include "guest" it is implied that they are asked to come alone.

Assembling Invitations: All enclosures should be placed on top of the invitation, in order of size with the smallest on top. The reply card should be placed under its envelope flap and this envelope should be printed with your return address and should be stamped as well. Insert everything into the inner envelope with the font size facing the flap so when your guests open the envelope they will see the lettering. Slip the UNSEALED inner envelope into the outer envelope with the guests names facing the back flap.

Proper Postage: Ensure you have your invitation checked by a mail clerk to ensure you are sending it with enough postage. Any delay could cause your guest to not receive their invitation in time. Out of country invitations will take longer to arrive.

Monday, February 1, 2010

Unique Ideas

I am constantly told by brides that come into the showroom that they find it hard to come up with new ideas on how to personalize the normal wedding traditions...from seating cards to centerpieces, it gets harder and harder to make your wedding unique and give it your personal touch. I have found a few unique options that I thought I would share. After all, no two couples are alike, so no two weddings should be either!


DIY Escort Card Display
Cut a poster of what ever theme you like - be it a an engagement photo or a city scape, into rectangles and add guests' names in small print beneath each section. Mount an identical poster beneath it so that the image will remain visible when guests take their cards. You can then keep the intact poster after the wedding to hang in your house.


Personalized Table Numbers
Instead of chronological table numbers, name each table a number that means something special to you. For example, 1,911 is the number of days you have been together as of your wedding date.


A Green Guest Book Option
Use river rocks in the place of a traditional guest book. Guests are asked to sign rocks, which can later be used in the new couple's garden.


Vase Variations

Gone are the days of matching centerpieces. A variation of size shape and content make for a much more interesting table display. Vary the combinations from table to table and keep the colour monochromatic for continutity throughout the room.


Duo Seating Cards
Use colour or design to help servers during the dinner service.
The colour of the illustration can indicate the guest's meal choice.


Stretch Your Guest List
For smaller receptions or to make your seating arrangement stand out, use long rectangular tables. Guests can be seated on both sides around the perimeter of the space but remeber to leave openings at each end for easy access. Place your dance floor in the middle so everyone can see the festivites. Accent the length of the tables with long rectangular vases filled with short cut flowers.


Seating Chart Display
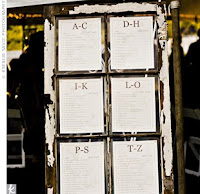
Display your seating chart so that it won't blow away by mounting it on a board, mirror or in this case an antique window pane. It can then be fastened to an easel so you your guests can easily see it.


Floral Heights
Lanterns don't always have to be used to house candles. Group lanterns filled with flowers and hang inside tents on hang from tree branches. Mark your aisle with lanterns on shepherd hooks or hang in varying heights to mark the area where the ceremony will take place. They can be moved easily and provide more decor at the reception.


Put a Spin on Your Guest Book
In lieu of a traditional guest book, have your guests use a metallic pen to sign a record of your first dance song.


Drama for Less
Use groups of tealights or votives in patterns or rows on long rectangular tables for lots of ambience. Create drama by using tall vases with coloured water and floating candles without the added cost of flowers.


Mix it Up
Though monochromatic looks are still popular, style concious couples have been switching things up a bit. Going with three hues is a big trend. One of the best ways to do it? Have half of the reception tables feature large centerpieces showcasing flowers in all three colours, while the other half can hold trios of mini arrangements - one in each colour. It looks luxe but is actually easy on your budget. The smaller arrangements will cost less than if you had the same large arrangement on every table. Even if you prefer one colour, mixing the heights of centerpieces remains a major trend; it helps add to the wow factor of your reception. Drawing the eye to different levels creates a flow throughout the room, which gives your reception lots of visual interest.
For more ideas visit www.theknot.com.